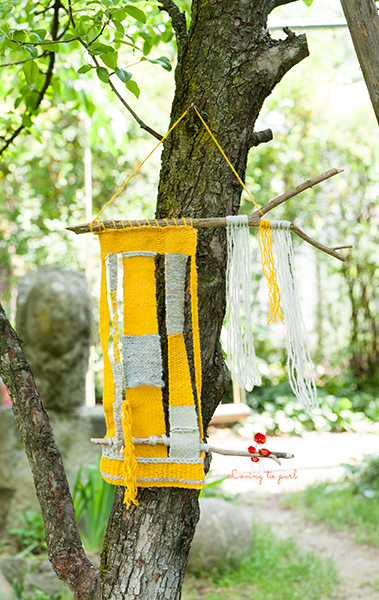
Yellow and grey weave with a small branch
I started weaving just a
few months ago and I love it. It is a process to learn all the ways to weave,
but it is a beautiful process.
Now days, you can find a
lot of resources on internet. From blogs to YouTube videos, you can find
inspiration and ideas to start learning to weave.
With my husband’s help I
made a loom for weaving from 4 pieces of wood and some screws. Most of my
weaving will be done on this loom.
Dimension: 20 cm X 55 cm with a 60 cm long stick..
Dimension: 20 cm X 55 cm with a 60 cm long stick..
Materials:
-
Homemade loom
-
White cotton for warp
-
Plastic needle
-
Yellow and different types of grey for weft
thread
-
Stick or branch for hanging
Directions:
Start warping the loom
with a slip knot on the first screw. Pull your warp thread across your loom to
the corresponding warp screw and bring your warp thread over the screw then
down around the back.
Pull your warp thread
across your loom again. So basically you are always crossing over the loom
around the screws.
When you are done make a
knot so your warp is tight. Because I just started to weave I am weaving from
bottom up.
I started with yellow and
with a needle I just did an over and under wave throughout the loom for a few
centimeters.
With grey I did the same
thing for 1cm on the loom.
With yellow I start
weaving but I did a 2 over and 2 under wave this time.
The grey part is another
type of weaving when you go over 2 warps in the front and one under in the
back. I tried a few times before getting right so don’t despair. Just repeat
until you get it right.
At this point I separated
the warp. Before starting weaving each part I connected the branch so it stays
in the same position. I did that with the help of the warp and I secured it
with grey thread.
Each part is done with
simple weaving: one over and one under.
I just changed the thread
numbers and colors. I used one thread or 2 and different types of grey.
I finished the whole
yellow part so it stays better on the wall.
If you got here means you
finished your weaving. Now you have to take it from the loom.
Start from the bottom and
take them out from the screws. Don’t forget to cut the knots from the
beginning. Tie two warps threads together and the weave the ends in through the
back of your weave.
Do the same thing for the
top one. Take another piece of yellow thread and stitch the weave on your
stick. Use the same thread to hang your weave on the wall. Tie this piece of
thread securely at both ends of your stick.
I add some yarn on the branch for a nice effect.

Enjoy weaving!
You are welcome to make and use this pattern as
you wish, but please do not sell the pattern nor claim the pattern as your own.
You are welcome to sell any item made using this
pattern, but please credit the designer.
Please link back to this page if you write about
the pattern in any way.
You may not reproduce the photos, pattern or
tutorial, either partially or in full, contained in this post without obtaining
written permission from me first.
If you would like to produce your own photo tutorial, video tutorial or translation of this pattern, please get in touch with me to obtain permission first.
Thank you!
If you would like to produce your own photo tutorial, video tutorial or translation of this pattern, please get in touch with me to obtain permission first.
Thank you!
I welcome all comments and questions as long as
they are spoken with kindness, and I will always try to extend the same respect
to you with my replies. If I feel your comment is inappropriate I will delete
it.


Comments
Post a Comment